EngineThemes Docs
  • 📕EngineThemes Docs
  • Overview
    • 💡EngineThemes
    • ✨Support Center
  • Getting Started
    • Download and install the theme
    • Basic information about WordPress
    • How to add Google Adsense
    • Backup Step by Step Guide
    • How to add header and footer menus
    • How to get and use child theme to customize your site
    • How to effectively report bugs and issues
    • How to get PayPal to redirect users back to your website after successful payment EngineThemes
    • Setup the Social Login feature EngineThemes
    • Update the theme EngineThemes
    • Using localization feature EngineThemes
  • MicrojobEngine
    • 1.1. MJE Package content
    • 1.2. MjE Introduction
    • 1.3. MjE main workflow
    • 1.4. MjE Page Structure
    • 2.1. MjE Import Data & Select Skin
    • 2.2. MjE Set up general information
    • 2.3. MjE Manage content and appearance
    • 2.4. MjE Set up menus and widgets
    • 2.5. MjE Customize the theme
    • 2.6. MjE Create custom pages using Elementor page builder plugin
    • 2.7. MjE Control basic information
    • 2.8. MjE Manage the emails
    • 2.9. MjE Update the theme
    • 2.10. MjE How to update the database
    • 3.2. MjE Manage “Post a mJob” form & Money withdraw
    • 3.3. MjE Manage Microjob Order Delivery mJob Extra Profile
    • 3.4. MjE Control member, payment, and withdrawal
    • 3.5. MjE How to use Credits to pay for listings & orders
    • 3.6. MjE How to set up payment via Stripe extension
    • 3.7. MjE Upload a video for your micro job
    • 3.8. MjE How to set up MjE Job Verification extension
    • 3.9. MjE How to set up MjE Bookmark extension
    • 3.10. How to set up MjE Recruit extension
    • 3.11. How to set up MjE Featured extension
    • 3.12. How to use MjE Crypto Payment
    • 4.1 How to use MJE Profile List plugin
  • FreelanceEngine
    • FrE Package content
    • FrE Introducing FreelanceEngine
    • FrE Main steps to set up the site
      • FrE Import Data
      • FrE Set up the general information
      • FrE Set up Post project form
      • FrE Manage the content and appearance
      • FrE Customize the theme
      • FRE Building Custom Homepage with Elementor
      • FrE Set up Stripe Escrow System
      • FrE Set up Credit in Escrow system
      • FrE Complete Menus and Widgets
    • FrE Complete the other settings
      • FrE Control all the basic information
      • FrE Portfolios Testimonials Management
      • FrE Email management
      • FrE Member and payment management
    • FrE Introducing the extensions
      • FrE Stripe
      • FrE Paymill
      • FrE SagePay
      • FrE PayUMoney
      • FrE Private Message
      • FrE Milestone
      • FrE Membership v2.0
      • FrE Set up Credit Plus
      • FrE Profile Slider
    • Localization
  • ForumEngine
    • FE Package content
    • FE Introducing theme
    • FE Main steps to set up the site
      • FE Import Data
      • FE Set up the general information
      • FE Thread category management
      • FE Content management
      • FE User Badges
      • FE Complete menus and widgets
    • FE Complete other settings
      • FE Quick Customization in FrontEnd
      • FE Frontend Control
      • FE Control All Essential Site Information
      • FE Overview management
      • FE Email template management
      • FE Member management
    • FE Introducing the extensions
      • FE Ideas Plugin
      • Community Chat Box Plugin V1.0
  • QAEngine
    • QAEngine Introducing Theme
    • QAEngine Main steps to set up the site
      • QAEngine Import Sample data guide
      • QAEngine Set up general information
      • QAEngine Manage content and appearance
      • QAEngine Customize the theme
      • QAEngine Menus and widgets
      • QAEngine Setting up the intro page
    • QAEngine Complete other settings
      • QAEngine Overview Feature
      • QAEngine Url slug, Captcha, Mailing
      • QAEngine Control members of your website
      • QAEngine User Badges
    • Community Chat Box Plugin V1.0
  • JobEngine
    • JE Package Content
    • JE Introducing JobEngine
    • JE Main steps to set up the site
      • JE Import Data
      • JE Set up wizard
      • JE Set up the general information
      • JE Set up Post a job form
      • JE Manage content and appearance
      • JE Customize the theme
      • JE Menus and widgets
    • JE Complete the settings
      • JE Approving and Rejecting a job post
      • JE EMail Template management
      • JE Editing a job post
      • JE Viewing Resumes, Jobs and Companies list
      • JE Adding currency
      • JE Tracking payment transactions
      • JE Accessing Overview
      • JE How to set up an Intro page
      • JE Use WPML in JobEngine & ClassifiedEngine
    • JE Introducing the extensions
      • JE PayUMoney Plugin Guide
      • JE Job Map Plugin guide
      • JE Paymill plugin guide
      • JE Jobroll Plugin Guide
      • JE Custom Fields Plugin Guide
      • JE Coupon plugin guide
      • JE Stripe Plugin Guide
      • JE Job Alert Plugin Guide
      • JE RSS Importer Plugin Guide
      • JE ET Slider guide
  • DirectoryEngine
    • DE Package content
    • DE Introducing Theme
    • DE Main steps to set up the site
      • DE Import data
      • DE Set up the general information
      • DE Set up Post places form
      • DE Customize the theme
      • DE Menus and widgets
    • DE Complete other settings
      • DE Emails management
      • DE Members and payments management
    • DE Introducing the extensions
  • EstateEngine
    • EE Package content
    • EE Introducing Theme
    • EE Main steps to set up the site
      • EE Import Data
      • EE Set Up Wizard
      • EE Set up general contents
      • EE Set up sidebars and widgets
      • EE Set up the general information
      • EE Setup submitting a property form
      • EE W3 Total Cache
      • EE Customize the theme
    • EE Complete other settings
      • EE Emails management
      • EE Members and payments management
    • EE Introducing the extensions
      • EE MultiRating
  • AE Extensions
    • AE PayUMoney
    • AE Paymill
    • AE SagePay
    • AE Stripe
Powered by GitBook
On this page
  1. FreelanceEngine
  2. FrE Main steps to set up the site

FrE Set up Post project form

PreviousFrE Set up the general informationNextFrE Manage the content and appearance

Last updated 3 months ago

Configuring Payment Settings in FreelanceEngine

To configure payment settings, navigate to Engine Settings > Settings > Payment and follow these steps to complete the setup:

  1. Select payment gateways.

  2. Create payment package plans.

  3. Specify additional information.

  4. Define project categories.

As "Posting a project" is the primary user action and the key revenue driver, ensure a "Post Projects" form is always available for users to showcase their projects.

Selecting Currency Format and Payment Gateways

Currency

Set your preferred local currency effortlessly, regardless of your location. Customize the number format (e.g., decimal points or thousand separators) to suit your needs. Access these options in the first section of the Payment tab.

Payment Gateways

FreelanceEngine supports three widely used payment gateways: PayPal, 2Checkout, and Cash. Enable your preferred gateways and disable any that are not required.

Creating Payment Plans

Payment plans are pricing packages that allow users to select options when posting projects. Each plan specifies the price, the duration a project remains active on your site, and the number of projects a user can post.

Adding a New Payment Plan

To create a new payment plan:

  1. Enter all required details.

  2. Click the Save button to finalize the plan.

Fields to Complete:

  • SKU: Unique identifier for the plan.

  • Plan Name: Enter a descriptive name for the payment plan.

  • Price: Specify the cost of the plan.

  • Availability: Define the number of days the plan remains active.

  • Number of Projects: Set the maximum number of projects an employer can post.

  • Project Type: Select a project type (configurable in the Project tab).

  • Short Description: Provide a brief overview of the plan.

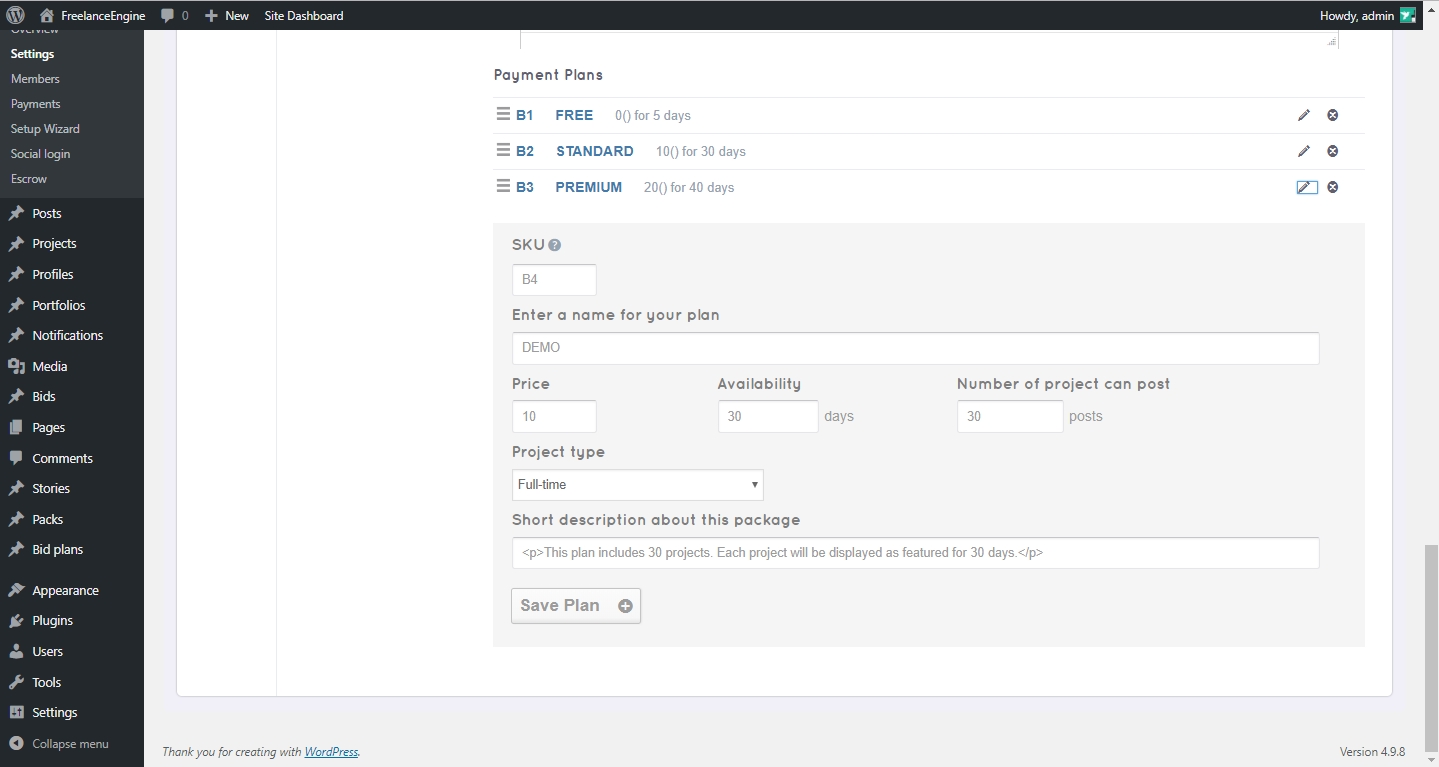
Editing a Payment Plan

To modify an existing plan, click the Pen icon next to the plan and update the details as needed.

Testing Payment Plans

After configuring the settings, activate Payment Test Mode to simulate transactions without incurring charges. This ensures your payment system functions correctly.

Once configured, users will encounter the payment interface when posting a project, tailored to your settings.

Specifying Additional Information

Enhance project postings by defining additional details under Engine Settings > Settings > Content. Available options include:

  • Maximum Number of Galleries: Set the number of categories a project can be assigned to by entering a value.

  • Project Category Order: Arrange category display order based on selected criteria.

  • Project Type Order: Organize project types according to chosen criteria.
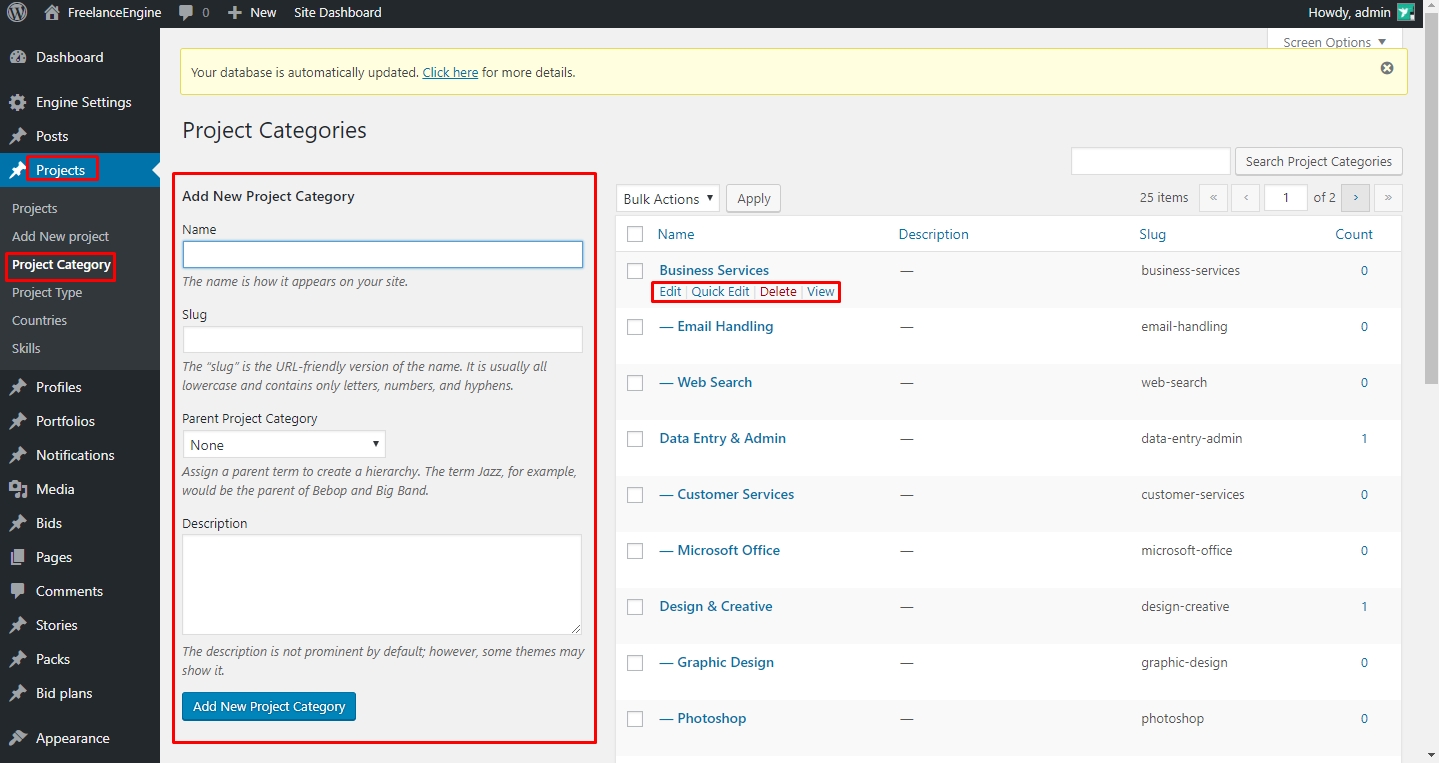
Creating Categories

Complete the setup by establishing categories for projects and profiles. These categories enable users to classify their posts effectively.

Project Categories

Admins can manage project categories as follows:

  • Adding a Category: In the left section of the page, fill in the required fields and click Add New Project Category to create it.

  • Managing Categories: In the right section, edit or delete existing categories as needed.

Profile Categories

Profile categories can be created using a similar process to project categories. Follow the same steps to add and manage them.