EngineThemes Docs
  • 📕EngineThemes Docs
  • Overview
    • 💡EngineThemes
    • ✨Support Center
  • Getting Started
    • Download and install the theme
    • Basic information about WordPress
    • How to add Google Adsense
    • Backup Step by Step Guide
    • How to add header and footer menus
    • How to get and use child theme to customize your site
    • How to effectively report bugs and issues
    • How to get PayPal to redirect users back to your website after successful payment EngineThemes
    • Setup the Social Login feature EngineThemes
    • Update the theme EngineThemes
    • Using localization feature EngineThemes
  • MicrojobEngine
    • 1.1. MJE Package content
    • 1.2. MjE Introduction
    • 1.3. MjE main workflow
    • 1.4. MjE Page Structure
    • 2.1. MjE Import Data & Select Skin
    • 2.2. MjE Set up general information
    • 2.3. MjE Manage content and appearance
    • 2.4. MjE Set up menus and widgets
    • 2.5. MjE Customize the theme
    • 2.6. MjE Create custom pages using Elementor page builder plugin
    • 2.7. MjE Control basic information
    • 2.8. MjE Manage the emails
    • 2.9. MjE Update the theme
    • 2.10. MjE How to update the database
    • 3.2. MjE Manage “Post a mJob” form & Money withdraw
    • 3.3. MjE Manage Microjob Order Delivery mJob Extra Profile
    • 3.4. MjE Control member, payment, and withdrawal
    • 3.5. MjE How to use Credits to pay for listings & orders
    • 3.6. MjE How to set up payment via Stripe extension
    • 3.7. MjE Upload a video for your micro job
    • 3.8. MjE How to set up MjE Job Verification extension
    • 3.9. MjE How to set up MjE Bookmark extension
    • 3.10. How to set up MjE Recruit extension
    • 3.11. How to set up MjE Featured extension
    • 3.12. How to use MjE Crypto Payment
    • 4.1 How to use MJE Profile List plugin
  • FreelanceEngine
    • FrE Package content
    • FrE Introducing FreelanceEngine
    • FrE Main steps to set up the site
      • FrE Import Data
      • FrE Set up the general information
      • FrE Set up Post project form
      • FrE Manage the content and appearance
      • FrE Customize the theme
      • FRE Building Custom Homepage with Elementor
      • FrE Set up Stripe Escrow System
      • FrE Set up Credit in Escrow system
      • FrE Complete Menus and Widgets
    • FrE Complete the other settings
      • FrE Control all the basic information
      • FrE Portfolios Testimonials Management
      • FrE Email management
      • FrE Member and payment management
    • FrE Introducing the extensions
      • FrE Stripe
      • FrE Paymill
      • FrE SagePay
      • FrE PayUMoney
      • FrE Private Message
      • FrE Milestone
      • FrE Membership v2.0
      • FrE Set up Credit Plus
      • FrE Profile Slider
    • Localization
  • ForumEngine
    • FE Package content
    • FE Introducing theme
    • FE Main steps to set up the site
      • FE Import Data
      • FE Set up the general information
      • FE Thread category management
      • FE Content management
      • FE User Badges
      • FE Complete menus and widgets
    • FE Complete other settings
      • FE Quick Customization in FrontEnd
      • FE Frontend Control
      • FE Control All Essential Site Information
      • FE Overview management
      • FE Email template management
      • FE Member management
    • FE Introducing the extensions
      • FE Ideas Plugin
      • Community Chat Box Plugin V1.0
  • QAEngine
    • QAEngine Introducing Theme
    • QAEngine Main steps to set up the site
      • QAEngine Import Sample data guide
      • QAEngine Set up general information
      • QAEngine Manage content and appearance
      • QAEngine Customize the theme
      • QAEngine Menus and widgets
      • QAEngine Setting up the intro page
    • QAEngine Complete other settings
      • QAEngine Overview Feature
      • QAEngine Url slug, Captcha, Mailing
      • QAEngine Control members of your website
      • QAEngine User Badges
    • Community Chat Box Plugin V1.0
  • JobEngine
    • JE Package Content
    • JE Introducing JobEngine
    • JE Main steps to set up the site
      • JE Import Data
      • JE Set up wizard
      • JE Set up the general information
      • JE Set up Post a job form
      • JE Manage content and appearance
      • JE Customize the theme
      • JE Menus and widgets
    • JE Complete the settings
      • JE Approving and Rejecting a job post
      • JE EMail Template management
      • JE Editing a job post
      • JE Viewing Resumes, Jobs and Companies list
      • JE Adding currency
      • JE Tracking payment transactions
      • JE Accessing Overview
      • JE How to set up an Intro page
      • JE Use WPML in JobEngine & ClassifiedEngine
    • JE Introducing the extensions
      • JE PayUMoney Plugin Guide
      • JE Job Map Plugin guide
      • JE Paymill plugin guide
      • JE Jobroll Plugin Guide
      • JE Custom Fields Plugin Guide
      • JE Coupon plugin guide
      • JE Stripe Plugin Guide
      • JE Job Alert Plugin Guide
      • JE RSS Importer Plugin Guide
      • JE ET Slider guide
  • DirectoryEngine
    • DE Package content
    • DE Introducing Theme
    • DE Main steps to set up the site
      • DE Import data
      • DE Set up the general information
      • DE Set up Post places form
      • DE Customize the theme
      • DE Menus and widgets
    • DE Complete other settings
      • DE Emails management
      • DE Members and payments management
    • DE Introducing the extensions
  • EstateEngine
    • EE Package content
    • EE Introducing Theme
    • EE Main steps to set up the site
      • EE Import Data
      • EE Set Up Wizard
      • EE Set up general contents
      • EE Set up sidebars and widgets
      • EE Set up the general information
      • EE Setup submitting a property form
      • EE W3 Total Cache
      • EE Customize the theme
    • EE Complete other settings
      • EE Emails management
      • EE Members and payments management
    • EE Introducing the extensions
      • EE MultiRating
  • AE Extensions
    • AE PayUMoney
    • AE Paymill
    • AE SagePay
    • AE Stripe
Powered by GitBook
On this page
  • Credit Settings & Management
  • Escrow Configuration Settings
  1. FreelanceEngine
  2. FrE Main steps to set up the site

FrE Set up Credit in Escrow system

PreviousFrE Set up Stripe Escrow SystemNextFrE Complete Menus and Widgets

Last updated 3 months ago

Credit is built to solve the absence of or working with Escrow system in FreelanceEngine in some countries. With the Credit, users can add fund in their account & later they can make any transaction on the site by using credits instead of the usual money - based methods.

Credit Settings & Management

Setting

To use Credit as a payment gateway for each transaction on your site, you must go to Engine Settings > Credit System.

Use credit system: You must enable this feature to allow users to use credit system on your site.

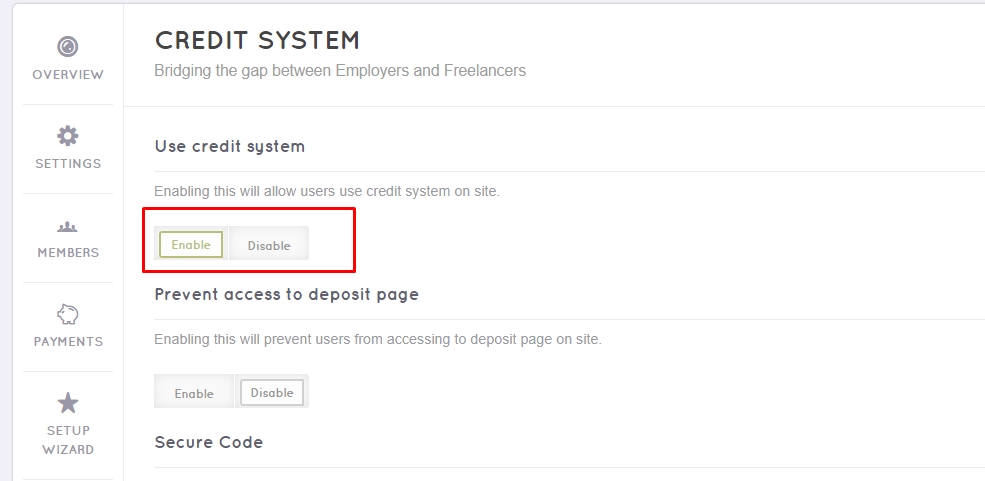
Prevent access to the deposit page: This feature permits you to prevent users access to deposit page on your site.

  • Secure code: You can enable this feature to turn on the secure code requiring for each credit transaction on your site.

  • Deposit page slug: You can set page slug to deposit page.

  • In order to create a deposit page, you go to Pages > Add new and copy the shortcode [fre_credit_deposit] onto the content field as the image below:

  • hen, set up the deposit page slug by selecting a page in the dropdown menu (only pages having shortcode [fre_credit_deposit] are displayed).

  • Admin's email who will receive notification: Enter admin's emails to receive the notification for each action on your site.

  • Minimum money in each withdraw process: You can set the minimum money required for each withdrawal process in this field. In case you do not set this field, the default minimum amount for withdrawal is 50. It means user cannot withdraw money if his available balance is smaller than 50.

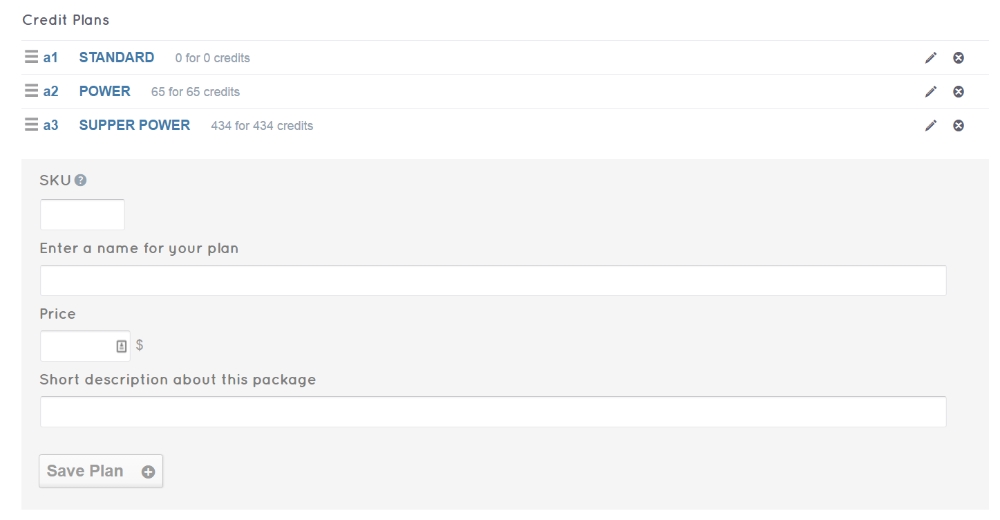
  • Credit plan: Create different pricing plans for employer to buy credits.

  • Mail template: Admin can create and manage mail templates for new messages involving each action on the site in this section.

Management

- Approve the payment when user buys credits so that the credits appear in the user’s account ( Engine Settings > Payments).

  • Credit plans.

  • Credit histories.

  • Credit withdraw.

Escrow Configuration Settings

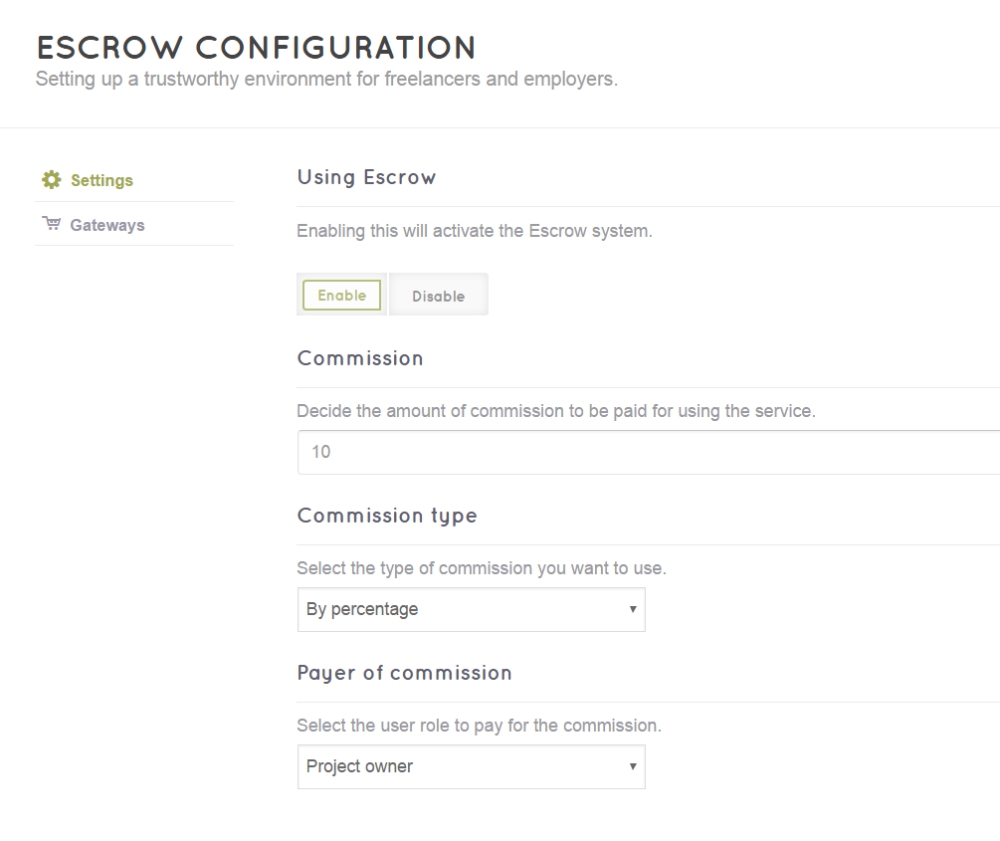
You can find the Escrow system’s setting page in your admin panel. Choose Engine settings > Escrow to set up Credit.

Settings

  • Using Escrow: You enable the Escrow system in this section.

  • Commission: This commission is the fee users have to pay for using your service. Simply insert the amount of commission you want to charge them.

Besides, you go to Engine settings > Settings > Content to set up the currency.

  • Commission type: You can select the type of commission you want to use in this section. There are two types for you to choose: by percentage or by a specific amount.

- Payer of commission: The employer is often the person who pays the commission. However, you can select the freelancer to be the payer.

Gateways

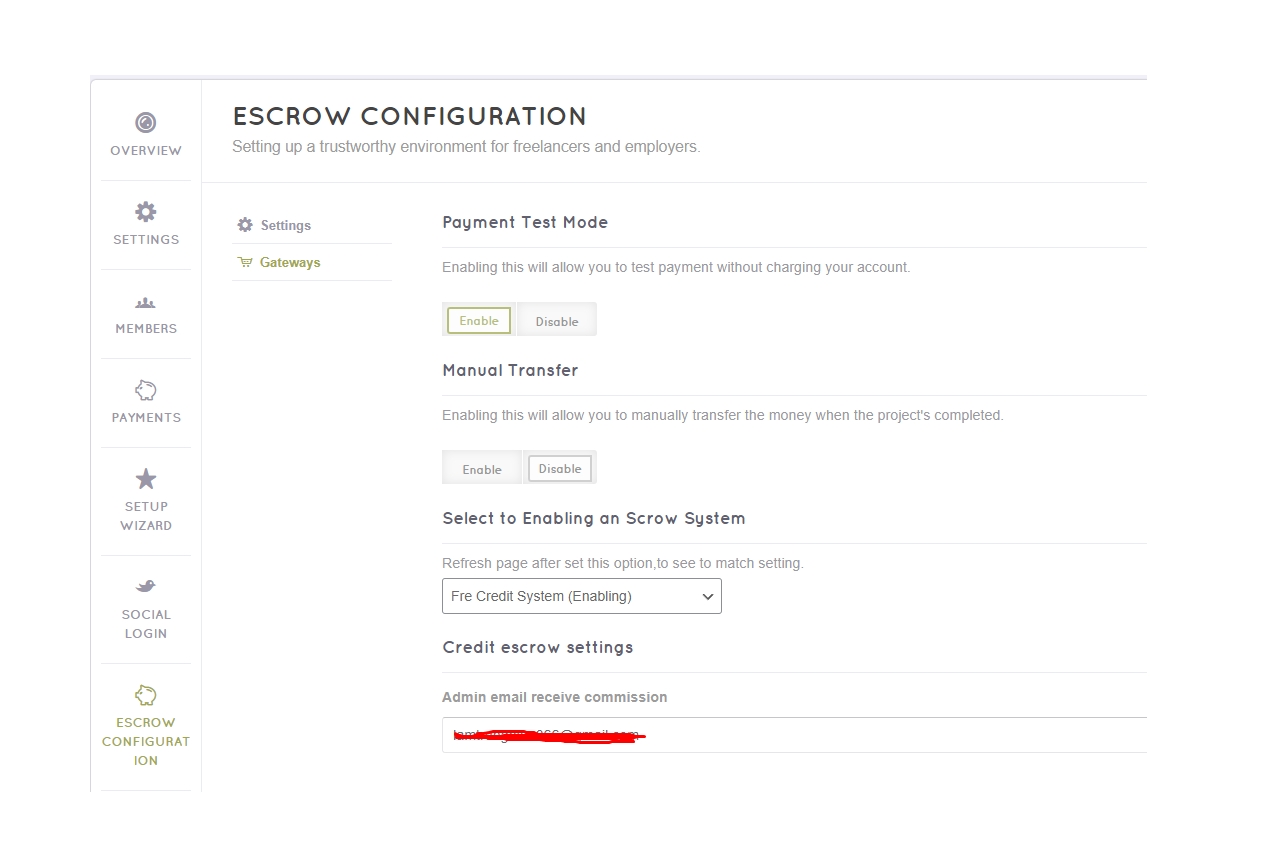
  • Payment Test Mode: You can either enable or disable test payment without charging your account.

  • Manual transfer: If you enable this option, you can manually transfer the money when the project is done.

To use Credit as a payment gateway working with Escrow system, you have to select FrE Credit System.

Credit Withdraws

  • When users make withdrawal requests, site admins will receive an email notifying about the credit withdraws.

  • As a site admin, you will navigate to Engine Settings > Withdraws to check or confirm the requests.
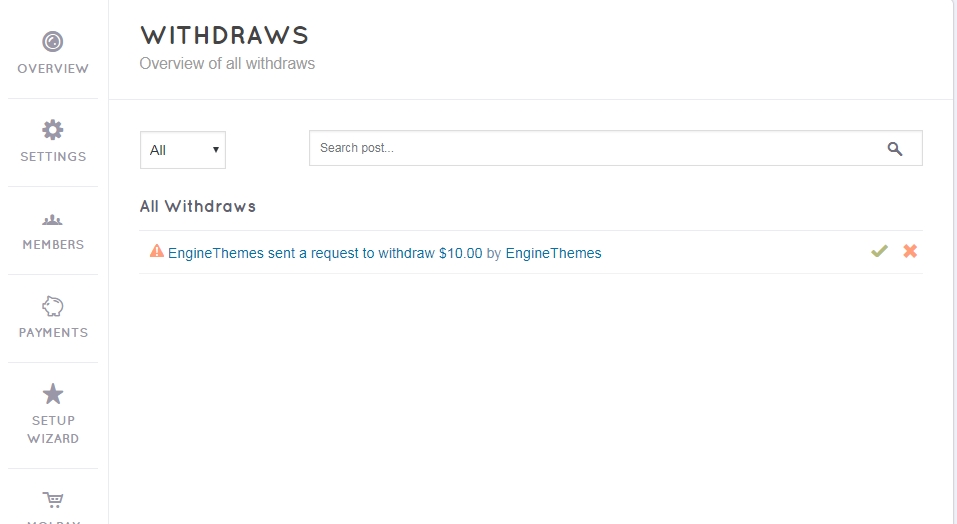
After you have manually transferred the money, you can approve the request. Or you can decline it in the first place if the user has violated any policy.

Note: When you select credit system to work with Escrow system on your project bidding website, and must be disabled.

Here, you can .

PayPal Adaptive
Stripe Connect
click on each request to be redirected to the information
PayPal Adaptive
Stripe Connect