EngineThemes Docs
  • 📕EngineThemes Docs
  • Overview
    • 💡EngineThemes
    • ✨Support Center
  • Getting Started
    • Download and install the theme
    • Basic information about WordPress
    • How to add Google Adsense
    • Backup Step by Step Guide
    • How to add header and footer menus
    • How to get and use child theme to customize your site
    • How to effectively report bugs and issues
    • How to get PayPal to redirect users back to your website after successful payment EngineThemes
    • Setup the Social Login feature EngineThemes
    • Update the theme EngineThemes
    • Using localization feature EngineThemes
  • MicrojobEngine
    • 1.1. MJE Package content
    • 1.2. MjE Introduction
    • 1.3. MjE main workflow
    • 1.4. MjE Page Structure
    • 2.1. MjE Import Data & Select Skin
    • 2.2. MjE Set up general information
    • 2.3. MjE Manage content and appearance
    • 2.4. MjE Set up menus and widgets
    • 2.5. MjE Customize the theme
    • 2.6. MjE Create custom pages using Elementor page builder plugin
    • 2.7. MjE Control basic information
    • 2.8. MjE Manage the emails
    • 2.9. MjE Update the theme
    • 2.10. MjE How to update the database
    • 3.2. MjE Manage “Post a mJob” form & Money withdraw
    • 3.3. MjE Manage Microjob Order Delivery mJob Extra Profile
    • 3.4. MjE Control member, payment, and withdrawal
    • 3.5. MjE How to use Credits to pay for listings & orders
    • 3.6. MjE How to set up payment via Stripe extension
    • 3.7. MjE Upload a video for your micro job
    • 3.8. MjE How to set up MjE Job Verification extension
    • 3.9. MjE How to set up MjE Bookmark extension
    • 3.10. How to set up MjE Recruit extension
    • 3.11. How to set up MjE Featured extension
    • 3.12. How to use MjE Crypto Payment
    • 4.1 How to use MJE Profile List plugin
  • FreelanceEngine
    • FrE Package content
    • FrE Introducing FreelanceEngine
    • FrE Main steps to set up the site
      • FrE Import Data
      • FrE Set up the general information
      • FrE Set up Post project form
      • FrE Manage the content and appearance
      • FrE Customize the theme
      • FRE Building Custom Homepage with Elementor
      • FrE Set up Stripe Escrow System
      • FrE Set up Credit in Escrow system
      • FrE Complete Menus and Widgets
    • FrE Complete the other settings
      • FrE Control all the basic information
      • FrE Portfolios Testimonials Management
      • FrE Email management
      • FrE Member and payment management
    • FrE Introducing the extensions
      • FrE Stripe
      • FrE Paymill
      • FrE SagePay
      • FrE PayUMoney
      • FrE Private Message
      • FrE Milestone
      • FrE Membership v2.0
      • FrE Set up Credit Plus
      • FrE Profile Slider
    • Localization
  • ForumEngine
    • FE Package content
    • FE Introducing theme
    • FE Main steps to set up the site
      • FE Import Data
      • FE Set up the general information
      • FE Thread category management
      • FE Content management
      • FE User Badges
      • FE Complete menus and widgets
    • FE Complete other settings
      • FE Quick Customization in FrontEnd
      • FE Frontend Control
      • FE Control All Essential Site Information
      • FE Overview management
      • FE Email template management
      • FE Member management
    • FE Introducing the extensions
      • FE Ideas Plugin
      • Community Chat Box Plugin V1.0
  • QAEngine
    • QAEngine Introducing Theme
    • QAEngine Main steps to set up the site
      • QAEngine Import Sample data guide
      • QAEngine Set up general information
      • QAEngine Manage content and appearance
      • QAEngine Customize the theme
      • QAEngine Menus and widgets
      • QAEngine Setting up the intro page
    • QAEngine Complete other settings
      • QAEngine Overview Feature
      • QAEngine Url slug, Captcha, Mailing
      • QAEngine Control members of your website
      • QAEngine User Badges
    • Community Chat Box Plugin V1.0
  • JobEngine
    • JE Package Content
    • JE Introducing JobEngine
    • JE Main steps to set up the site
      • JE Import Data
      • JE Set up wizard
      • JE Set up the general information
      • JE Set up Post a job form
      • JE Manage content and appearance
      • JE Customize the theme
      • JE Menus and widgets
    • JE Complete the settings
      • JE Approving and Rejecting a job post
      • JE EMail Template management
      • JE Editing a job post
      • JE Viewing Resumes, Jobs and Companies list
      • JE Adding currency
      • JE Tracking payment transactions
      • JE Accessing Overview
      • JE How to set up an Intro page
      • JE Use WPML in JobEngine & ClassifiedEngine
    • JE Introducing the extensions
      • JE PayUMoney Plugin Guide
      • JE Job Map Plugin guide
      • JE Paymill plugin guide
      • JE Jobroll Plugin Guide
      • JE Custom Fields Plugin Guide
      • JE Coupon plugin guide
      • JE Stripe Plugin Guide
      • JE Job Alert Plugin Guide
      • JE RSS Importer Plugin Guide
      • JE ET Slider guide
  • DirectoryEngine
    • DE Package content
    • DE Introducing Theme
    • DE Main steps to set up the site
      • DE Import data
      • DE Set up the general information
      • DE Set up Post places form
      • DE Customize the theme
      • DE Menus and widgets
    • DE Complete other settings
      • DE Emails management
      • DE Members and payments management
    • DE Introducing the extensions
  • EstateEngine
    • EE Package content
    • EE Introducing Theme
    • EE Main steps to set up the site
      • EE Import Data
      • EE Set Up Wizard
      • EE Set up general contents
      • EE Set up sidebars and widgets
      • EE Set up the general information
      • EE Setup submitting a property form
      • EE W3 Total Cache
      • EE Customize the theme
    • EE Complete other settings
      • EE Emails management
      • EE Members and payments management
    • EE Introducing the extensions
      • EE MultiRating
  • AE Extensions
    • AE PayUMoney
    • AE Paymill
    • AE SagePay
    • AE Stripe
Powered by GitBook
On this page
  1. MicrojobEngine

3.2. MjE Manage “Post a mJob” form & Money withdraw

Previous2.10. MjE How to update the databaseNext3.3. MjE Manage Microjob Order Delivery mJob Extra Profile

Last updated 3 months ago

To make it easy for you, setup steps in this section will follow the steps when a user posts a mJob in the front-end:

1. Payment plans:

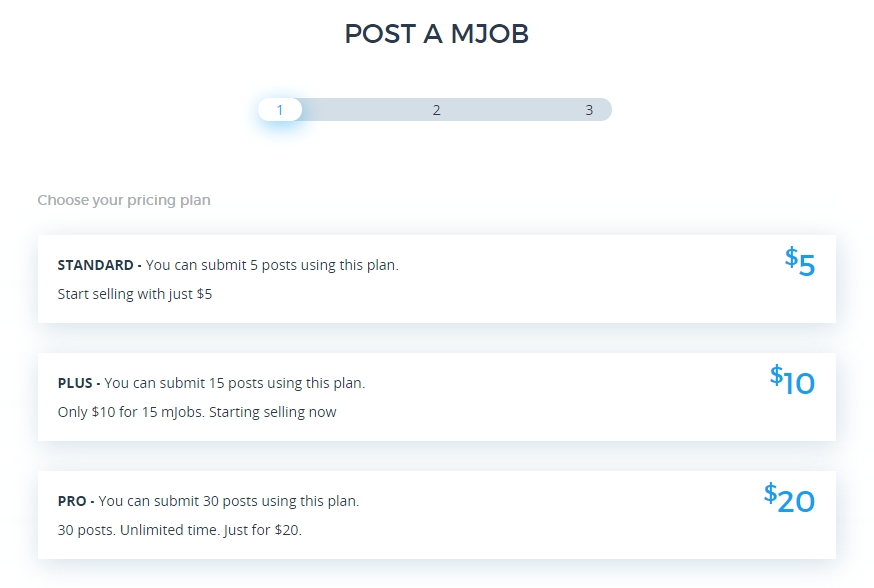
Payment plans are price packages you create for your users to choose when posting mJobs. Each payment plan shows package name, price, period (in days) a mJob will be activated on your site and the number of mJobs that can be posted with the package.

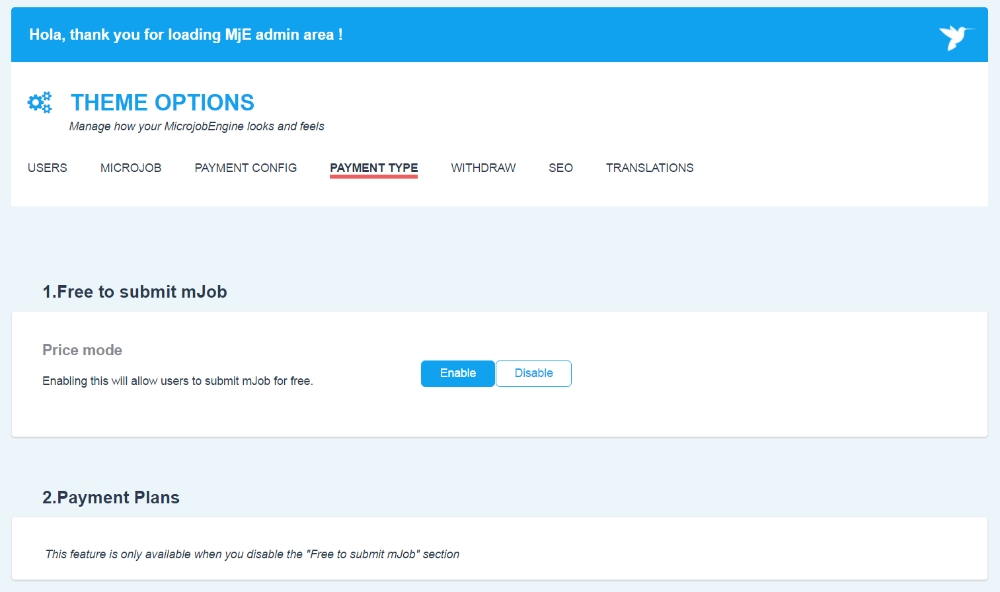
Where? Engine Settings → Theme Options → Payment Type.

How?

  • Enable the “Price mode” field under the “Free to submit mJob” section.

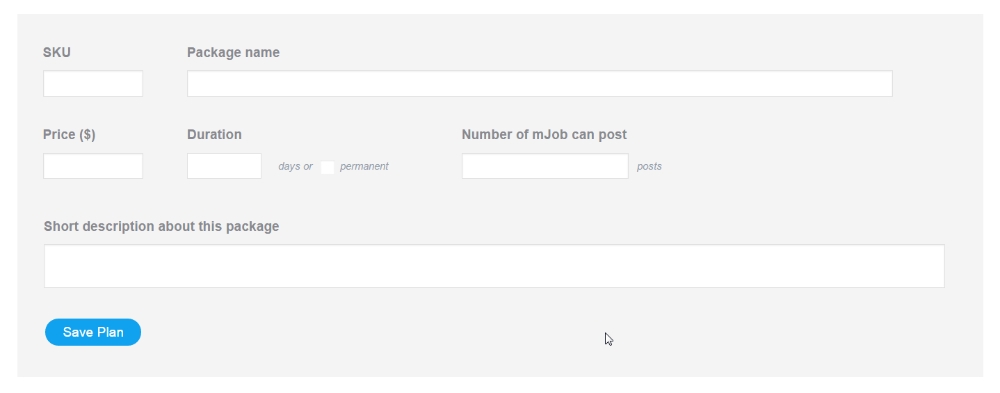
Create a payment plan:

Fill in the following information:

  • SKU

  • Name for your plan

  • Price

  • Duration: the time (in days) a mJob is active on site. It can be permanent.

  • Number of mJobs that can be posted using this package.

  • Short description about this package.

Then click " Save plan" to complete.
Edit a payment plan:

You can also edit payment plans by clicking the Pencil icon next to it.

After that, you can enable Payment test mode to check your payment plans without having your account charged.

This is how your payment plans should look like in front-end:
However, you can encourage users to post mJobs to your site by making it free to submit mJobs, especially in the first days running your website. Whenever you disable the price mode field, all payment plans are hidden as the image below:
2. Custom pricing:

Where? Engine Settings > Theme Options > Microjob > mJob Price**.**

How? There are 2 options allowing you to set either custom price or fixed price in the price mode.

  • Custom price:

When you enable the custom option, sellers can set specific price for each of their mJobs. Besides, you have to set the minimum and maximum prices applied for mJob in the custom price section.

Minimum price must be greater than 0.

There’s no limit to the maximum price, but it must be greater than minimum price.

Both minimum & maximum price must be an integer.

  • Fixed price

If you choose fixed price as your settings, you only need to set a default price applied for all mJobs on your site. This means the seller cannot customize their mJob price.

How it look on the front-end when you choose custom pricing option?

In the “Post a mJob” form, there is an additional field to express the minimum & maximum prices permitting seller to set their mJob. See the image below:

MJob details:

After choosing a package plan, a user would fill in details of the mJob. In this step, you need to create mJob categories for users to choose from.

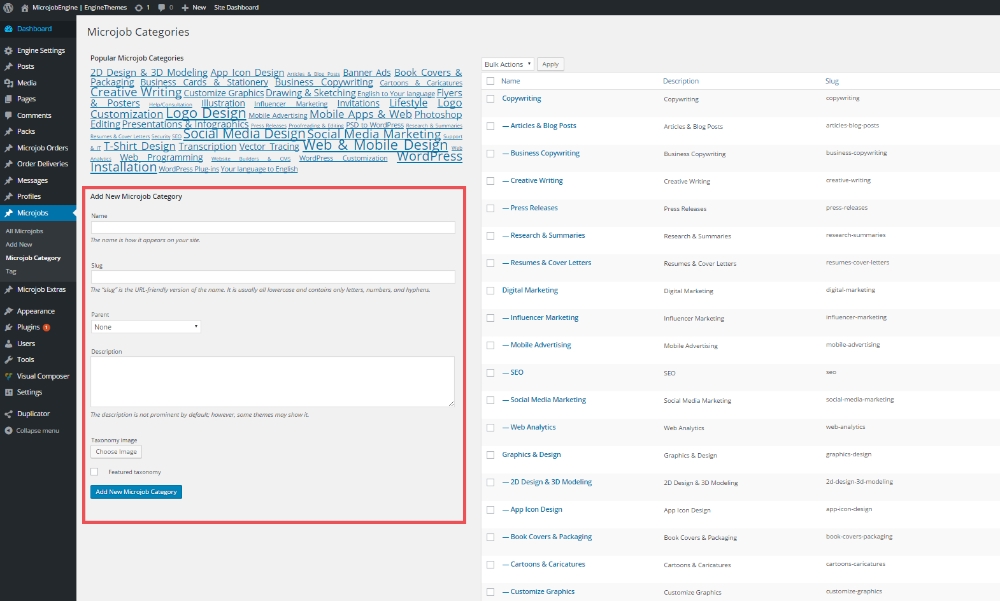
Where? Microjobs → Microjob Category. This section allows admins to add and control all the mJob categories.

How? In the left column, fill in necessary information to create a mJob category, including name, slug, parent (if it is a sub category), description, image. You can then edit or delete mJob categories in the right column.
4. Payment methods:

There are 3 main settings: Payment currency, Commission fee, and Payment gateways.

How?

  • Payment currency & Commission:

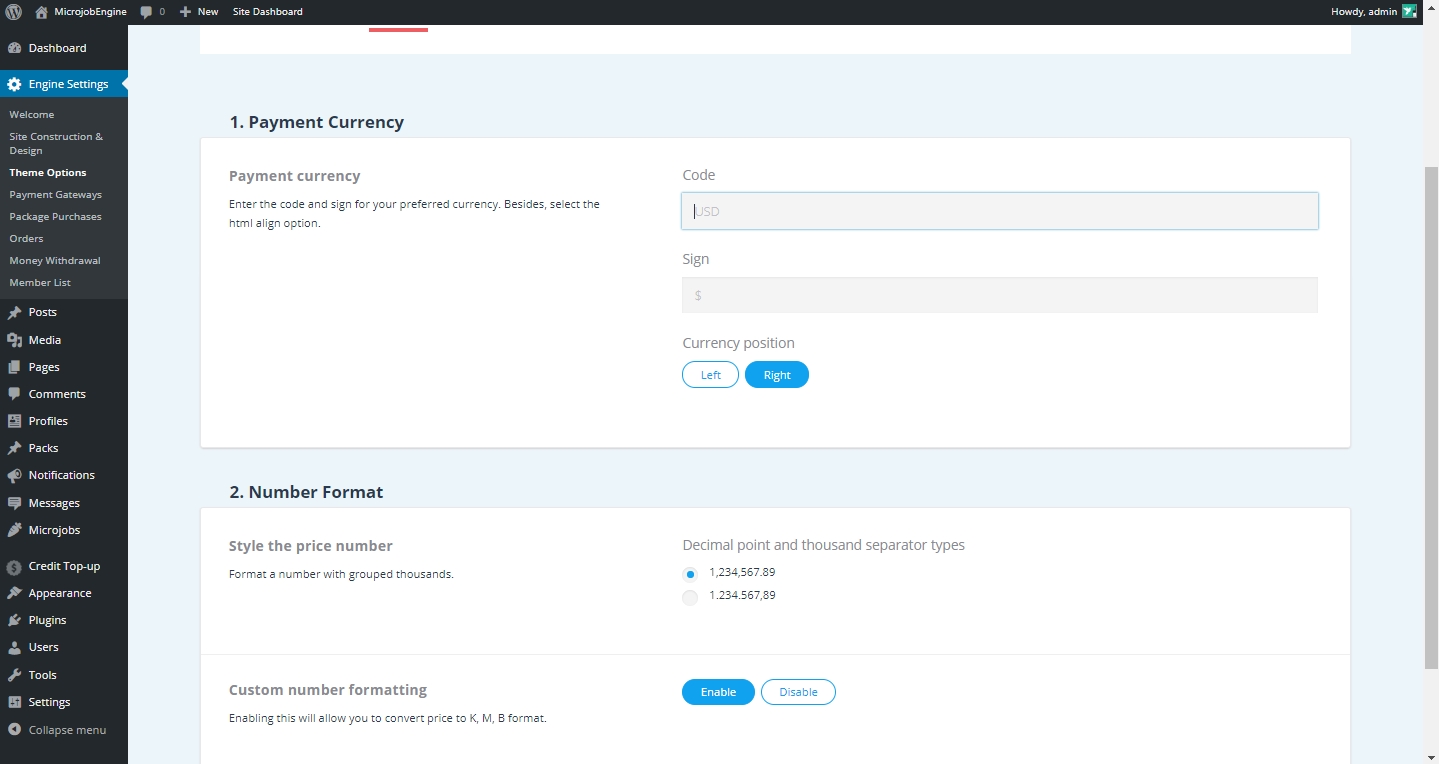
Wherever you are, it is easier than ever to set your very own local currency with flexible choices for number format (decimal point or thousand separator). You can also format the displayed number.

(Set up the Payment currency in Engine Settings → Theme Options → Currency.)
On the other hand, commission fee is an effective way of monetization. In MicrojobEngine, this fee is calculated as the percentage (%) of the mJob price. For instance, if you fill in number 10 in this section, your commission fee over 1 posted mJob is 10% of total price of that mJob.

(Set up the commission in Engine Settings > Theme Options > Microjobs > 2. Micrjob Price)

Payment gateways:

There are 4 supported payment gateways: PayPal, 2Checkout, Cash, and Credit. You can use all of them, or disable some.

*Note:

- Since PayPal doesn’t allow orders with the same invoice number, a new field is available for you to add the prefix to avoid the case of invoice number duplication. Remember that you MUST enter a unique prefix if your PayPal account is used for multiple websites.

5. Money withdraw

Where? Engine Settings → Theme Options → Withdraw

How? When users withdraw money from your site, you can set the minimum amount required for each withdrawal.

Since 2CheckOut prohibits selling Products/Services as an Agent for a Third Party ( ), 2CheckOut can only be used for selling package to post mJobs in your marketplace and is not available when users order mJobs.

https://www.2checkout.com/policies/prohibited-product-list/