EngineThemes Docs
  • 📕EngineThemes Docs
  • Overview
    • 💡EngineThemes
    • ✨Support Center
  • Getting Started
    • Download and install the theme
    • Basic information about WordPress
    • How to add Google Adsense
    • Backup Step by Step Guide
    • How to add header and footer menus
    • How to get and use child theme to customize your site
    • How to effectively report bugs and issues
    • How to get PayPal to redirect users back to your website after successful payment EngineThemes
    • Setup the Social Login feature EngineThemes
    • Update the theme EngineThemes
    • Using localization feature EngineThemes
  • MicrojobEngine
    • 1.1. MJE Package content
    • 1.2. MjE Introduction
    • 1.3. MjE main workflow
    • 1.4. MjE Page Structure
    • 2.1. MjE Import Data & Select Skin
    • 2.2. MjE Set up general information
    • 2.3. MjE Manage content and appearance
    • 2.4. MjE Set up menus and widgets
    • 2.5. MjE Customize the theme
    • 2.6. MjE Create custom pages using Elementor page builder plugin
    • 2.7. MjE Control basic information
    • 2.8. MjE Manage the emails
    • 2.9. MjE Update the theme
    • 2.10. MjE How to update the database
    • 3.2. MjE Manage “Post a mJob” form & Money withdraw
    • 3.3. MjE Manage Microjob Order Delivery mJob Extra Profile
    • 3.4. MjE Control member, payment, and withdrawal
    • 3.5. MjE How to use Credits to pay for listings & orders
    • 3.6. MjE How to set up payment via Stripe extension
    • 3.7. MjE Upload a video for your micro job
    • 3.8. MjE How to set up MjE Job Verification extension
    • 3.9. MjE How to set up MjE Bookmark extension
    • 3.10. How to set up MjE Recruit extension
    • 3.11. How to set up MjE Featured extension
    • 3.12. How to use MjE Crypto Payment
    • 4.1 How to use MJE Profile List plugin
  • FreelanceEngine
    • FrE Package content
    • FrE Introducing FreelanceEngine
    • FrE Main steps to set up the site
      • FrE Import Data
      • FrE Set up the general information
      • FrE Set up Post project form
      • FrE Manage the content and appearance
      • FrE Customize the theme
      • FRE Building Custom Homepage with Elementor
      • FrE Set up Stripe Escrow System
      • FrE Set up Credit in Escrow system
      • FrE Complete Menus and Widgets
    • FrE Complete the other settings
      • FrE Control all the basic information
      • FrE Portfolios Testimonials Management
      • FrE Email management
      • FrE Member and payment management
    • FrE Introducing the extensions
      • FrE Stripe
      • FrE Paymill
      • FrE SagePay
      • FrE PayUMoney
      • FrE Private Message
      • FrE Milestone
      • FrE Membership v2.0
      • FrE Set up Credit Plus
      • FrE Profile Slider
    • Localization
  • ForumEngine
    • FE Package content
    • FE Introducing theme
    • FE Main steps to set up the site
      • FE Import Data
      • FE Set up the general information
      • FE Thread category management
      • FE Content management
      • FE User Badges
      • FE Complete menus and widgets
    • FE Complete other settings
      • FE Quick Customization in FrontEnd
      • FE Frontend Control
      • FE Control All Essential Site Information
      • FE Overview management
      • FE Email template management
      • FE Member management
    • FE Introducing the extensions
      • FE Ideas Plugin
      • Community Chat Box Plugin V1.0
  • QAEngine
    • QAEngine Introducing Theme
    • QAEngine Main steps to set up the site
      • QAEngine Import Sample data guide
      • QAEngine Set up general information
      • QAEngine Manage content and appearance
      • QAEngine Customize the theme
      • QAEngine Menus and widgets
      • QAEngine Setting up the intro page
    • QAEngine Complete other settings
      • QAEngine Overview Feature
      • QAEngine Url slug, Captcha, Mailing
      • QAEngine Control members of your website
      • QAEngine User Badges
    • Community Chat Box Plugin V1.0
  • JobEngine
    • JE Package Content
    • JE Introducing JobEngine
    • JE Main steps to set up the site
      • JE Import Data
      • JE Set up wizard
      • JE Set up the general information
      • JE Set up Post a job form
      • JE Manage content and appearance
      • JE Customize the theme
      • JE Menus and widgets
    • JE Complete the settings
      • JE Approving and Rejecting a job post
      • JE EMail Template management
      • JE Editing a job post
      • JE Viewing Resumes, Jobs and Companies list
      • JE Adding currency
      • JE Tracking payment transactions
      • JE Accessing Overview
      • JE How to set up an Intro page
      • JE Use WPML in JobEngine & ClassifiedEngine
    • JE Introducing the extensions
      • JE PayUMoney Plugin Guide
      • JE Job Map Plugin guide
      • JE Paymill plugin guide
      • JE Jobroll Plugin Guide
      • JE Custom Fields Plugin Guide
      • JE Coupon plugin guide
      • JE Stripe Plugin Guide
      • JE Job Alert Plugin Guide
      • JE RSS Importer Plugin Guide
      • JE ET Slider guide
  • DirectoryEngine
    • DE Package content
    • DE Introducing Theme
    • DE Main steps to set up the site
      • DE Import data
      • DE Set up the general information
      • DE Set up Post places form
      • DE Customize the theme
      • DE Menus and widgets
    • DE Complete other settings
      • DE Emails management
      • DE Members and payments management
    • DE Introducing the extensions
  • EstateEngine
    • EE Package content
    • EE Introducing Theme
    • EE Main steps to set up the site
      • EE Import Data
      • EE Set Up Wizard
      • EE Set up general contents
      • EE Set up sidebars and widgets
      • EE Set up the general information
      • EE Setup submitting a property form
      • EE W3 Total Cache
      • EE Customize the theme
    • EE Complete other settings
      • EE Emails management
      • EE Members and payments management
    • EE Introducing the extensions
      • EE MultiRating
  • AE Extensions
    • AE PayUMoney
    • AE Paymill
    • AE SagePay
    • AE Stripe
Powered by GitBook
On this page
  1. JobEngine
  2. JE Main steps to set up the site

JE Set up the general information

PreviousJE Set up wizardNextJE Set up Post a job form

Last updated 3 months ago

You can set up the main information for your site in two tabs: General and Branding. Choose Engine settings > Settings and you can see them. In these two tabs, you can insert the Website title, description and upload the logos. You can come back later once complete all the main settings.
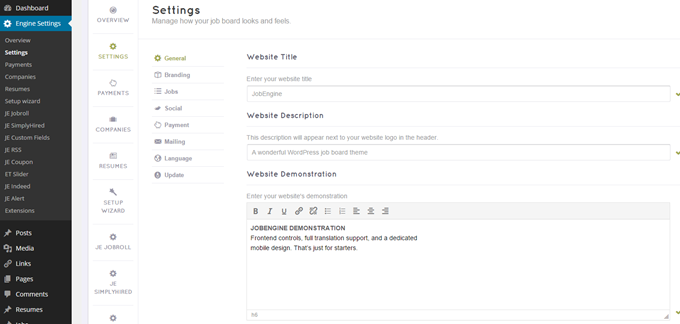
General

This section allows you to set up general information for your site:

  • Website title: insert title for your website.

  • Website description: This will appear next to your logo in header.

  • Website demonstration.

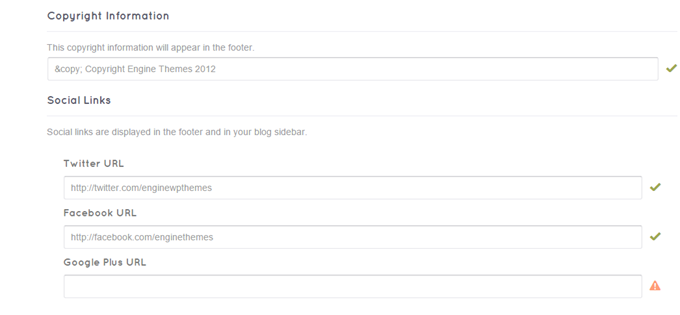
  • Copyright: This will appear in the footer.

  • Social link: insert the Url of your Facebook, Twitter, GooglePlus so your user can contact you through social page. They will appear in the footer and your blog sidebar.

  • Google analytics script: This is a service offered by Google that generates detailed statistics of the visits made to your site.

  • Use Google Captcha: Enabling this option makes your users submit form have to fill in google captcha

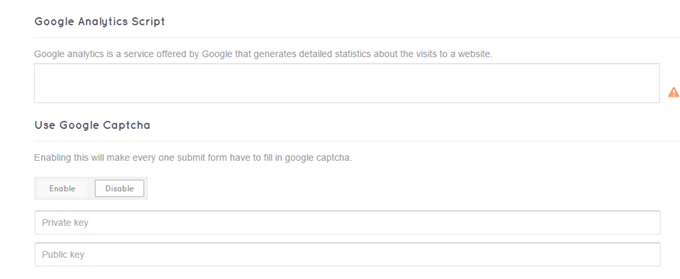
Note: If you are using the reCAPTCHA V1, unfortunately, it has been shut down since March 2018.

Please make sure that you have updated our theme to the latest version.

After the update, please obtain new reCaptcha v2 API for the feature to work by getting a new key with the link in the Setting section.

Branding

This part will ask you to upload logos for your site’s desktop and mobile versions. Should you want to make any changes on your branding later, you can access Engine Settings > Settings > Branding from back-end. Logos for desktop and mobile have different image file requirement:

Desktop version logo

  • Preferably transparent

  • png, gif or jpg format

  • 150x50px image size

  • Less than 200kb image file size

Mobile version logo

57x57px image size