QAEngine Menus and widgets
1. How to create the menus?
QAEngine supports the header and left menus. You can use this to add, sort or display priority information in your site. You can follow these step to create the menu:
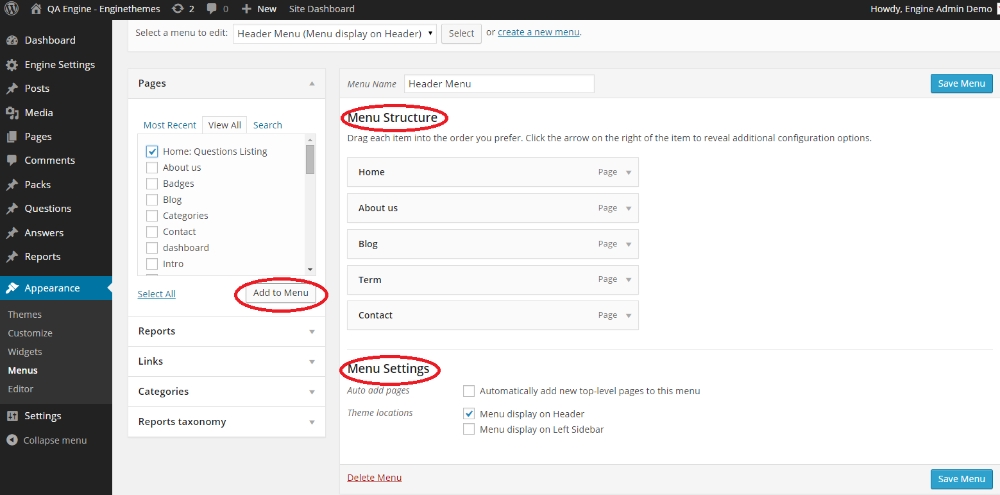
• Go to Appearance -> Menus
• Choose Create a new menu
• Insert Menu name then click Create menu

Now you’re good to choose custom links, pages or categories and add them to your menus.
To create a header menu similar to our demo site, check the following options:
• Home
• About us
• Blog
• Term
• Contact

Click Add to menu then Save menu. You can also drag the items to the suitable order.
Finally, on Theme Locations, select where you want it to appear- in this case, it is “ Header menu”. Do not forget to click Save Menu button.
After completing your settings, the Header menu will be displayed as below in the front-end.

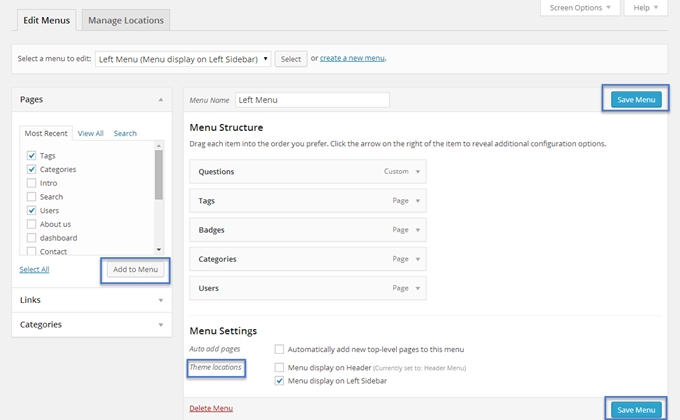
To create menu located on the left sidebar similar to our demo site, check the following options:
• Questions.
• Tags.
• Badges.
• Categories.
• Users.
Click Add to menu then Save menu.
Finally, on Theme Locations, select where you want them to appear – in this case is “ Menu display on left sidebar”. Don’t forget to hit Save.

Additional setting
Add icons in front of the page’s name.
Activating the CSS section
Choose Screen option button.
Tick the CSS Classes option.

Add an icon
Visit the following link: http://fortawesome.github.io/Font-Awesome/icons/.
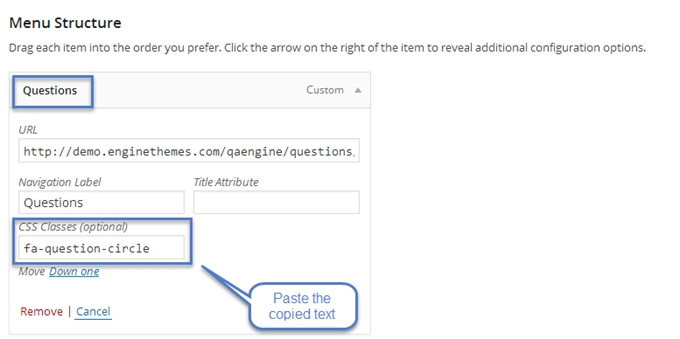
Choose an icon that you like, copy the text and paste it in the CSS Classes section.
For example, if you want to add an icon in front of the Questions page:
Copy the text in the site: https://fontawesome.com/icons
Paste the text in the Questions section

• You can do similar settings for the others.

After completing your settings, the Left menu will be displayed as below in the front-end.

2. How to use widgets?
From the back-end, choose Appearance -> Widgets.
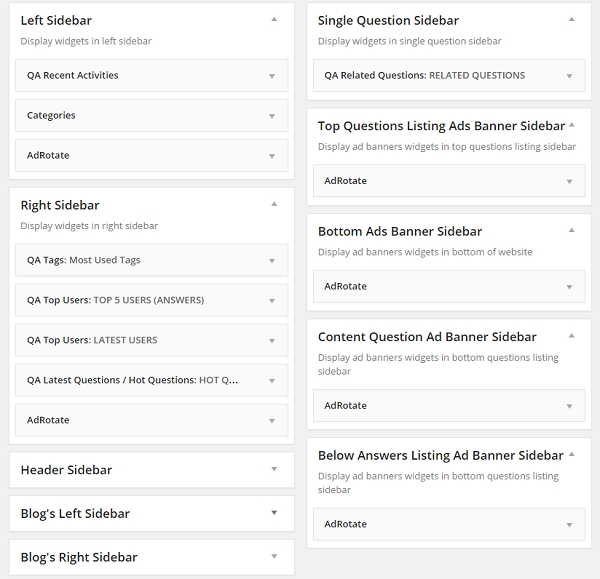
In Available Widgets, there is a list of widgets you can add to some sidebars on the right. You can add a widget by dragging it to any sidebar to want to add in.

After adding widgets, you can customize it by click on the widget which has just been added and set up some data for it. You can see the example in below photo, such as changing title of widget and number of activities displayed.

QAEngine supports some more widgets beside all default WP widgets:
QA Recent Activities widget shows all new activities of the current logged user. So, it won’t show anything if you are not logged into any account. Also, the number of activities can set up by Number of activities to display option on the QA Recent Activities setting form. On the homepage, your user can click “View all” to check all his activities. As our default design, it displays on the Left sidebar and Blog's Left sidebar.
QA Statistic widget helps admin count the number of questions and numbers of users on his site currently. You can show it on any supported sidebar of QAEngine. As default, it is on the Right sidebar.
QA Tags widget lists all tags of your site and also the number of questions has been used for each tag. You can set the default number of tags list that will show on your tags list in the front-end. Clicking “See more tags” to view all tags. It should locate on the right sidebar if you wish to set up your site as our demo site.
QA Latest Questions/Hot Questions widget will show all hot questions or latest questions as your need. You can also set up the number of questions to display. If you need to show the latest questions only, you should tick on the “Latest questions (sort by day)” and choose the date range as well. As dafault, it is on the right sidebar and blog's right sidebar.
QA Related Questions widget will list all the same or quite similar questions for users to find the relevant ones.
Don’t forget to click “Save” button to keep all your settings.

Attention: If you want to display ad banners on your website, be sure to use the AdRotate plugin, which can be downloaded for free from WordPress.org. Once installed, you can create ad banners and drag them into one of two sidebars: the "Top Questions Listing Ads Banner" or the "Bottom Ads Banner Sidebar." After that, your ad banners will be ready to appear on your website.
Last updated