EngineThemes Docs
  • 📕EngineThemes Docs
  • Overview
    • 💡EngineThemes
    • ✨Support Center
  • Getting Started
    • Download and install the theme
    • Basic information about WordPress
    • How to add Google Adsense
    • Backup Step by Step Guide
    • How to add header and footer menus
    • How to get and use child theme to customize your site
    • How to effectively report bugs and issues
    • How to get PayPal to redirect users back to your website after successful payment EngineThemes
    • Setup the Social Login feature EngineThemes
    • Update the theme EngineThemes
    • Using localization feature EngineThemes
  • MicrojobEngine
    • 1.1. MJE Package content
    • 1.2. MjE Introduction
    • 1.3. MjE main workflow
    • 1.4. MjE Page Structure
    • 2.1. MjE Import Data & Select Skin
    • 2.2. MjE Set up general information
    • 2.3. MjE Manage content and appearance
    • 2.4. MjE Set up menus and widgets
    • 2.5. MjE Customize the theme
    • 2.6. MjE Create custom pages using Elementor page builder plugin
    • 2.7. MjE Control basic information
    • 2.8. MjE Manage the emails
    • 2.9. MjE Update the theme
    • 2.10. MjE How to update the database
    • 3.2. MjE Manage “Post a mJob” form & Money withdraw
    • 3.3. MjE Manage Microjob Order Delivery mJob Extra Profile
    • 3.4. MjE Control member, payment, and withdrawal
    • 3.5. MjE How to use Credits to pay for listings & orders
    • 3.6. MjE How to set up payment via Stripe extension
    • 3.7. MjE Upload a video for your micro job
    • 3.8. MjE How to set up MjE Job Verification extension
    • 3.9. MjE How to set up MjE Bookmark extension
    • 3.10. How to set up MjE Recruit extension
    • 3.11. How to set up MjE Featured extension
    • 3.12. How to use MjE Crypto Payment
    • 4.1 How to use MJE Profile List plugin
  • FreelanceEngine
    • FrE Package content
    • FrE Introducing FreelanceEngine
    • FrE Main steps to set up the site
      • FrE Import Data
      • FrE Set up the general information
      • FrE Set up Post project form
      • FrE Manage the content and appearance
      • FrE Customize the theme
      • FRE Building Custom Homepage with Elementor
      • FrE Set up Stripe Escrow System
      • FrE Set up Credit in Escrow system
      • FrE Complete Menus and Widgets
    • FrE Complete the other settings
      • FrE Control all the basic information
      • FrE Portfolios Testimonials Management
      • FrE Email management
      • FrE Member and payment management
    • FrE Introducing the extensions
      • FrE Stripe
      • FrE Paymill
      • FrE SagePay
      • FrE PayUMoney
      • FrE Private Message
      • FrE Milestone
      • FrE Membership v2.0
      • FrE Set up Credit Plus
      • FrE Profile Slider
    • Localization
  • ForumEngine
    • FE Package content
    • FE Introducing theme
    • FE Main steps to set up the site
      • FE Import Data
      • FE Set up the general information
      • FE Thread category management
      • FE Content management
      • FE User Badges
      • FE Complete menus and widgets
    • FE Complete other settings
      • FE Quick Customization in FrontEnd
      • FE Frontend Control
      • FE Control All Essential Site Information
      • FE Overview management
      • FE Email template management
      • FE Member management
    • FE Introducing the extensions
      • FE Ideas Plugin
      • Community Chat Box Plugin V1.0
  • QAEngine
    • QAEngine Introducing Theme
    • QAEngine Main steps to set up the site
      • QAEngine Import Sample data guide
      • QAEngine Set up general information
      • QAEngine Manage content and appearance
      • QAEngine Customize the theme
      • QAEngine Menus and widgets
      • QAEngine Setting up the intro page
    • QAEngine Complete other settings
      • QAEngine Overview Feature
      • QAEngine Url slug, Captcha, Mailing
      • QAEngine Control members of your website
      • QAEngine User Badges
    • Community Chat Box Plugin V1.0
  • JobEngine
    • JE Package Content
    • JE Introducing JobEngine
    • JE Main steps to set up the site
      • JE Import Data
      • JE Set up wizard
      • JE Set up the general information
      • JE Set up Post a job form
      • JE Manage content and appearance
      • JE Customize the theme
      • JE Menus and widgets
    • JE Complete the settings
      • JE Approving and Rejecting a job post
      • JE EMail Template management
      • JE Editing a job post
      • JE Viewing Resumes, Jobs and Companies list
      • JE Adding currency
      • JE Tracking payment transactions
      • JE Accessing Overview
      • JE How to set up an Intro page
      • JE Use WPML in JobEngine & ClassifiedEngine
    • JE Introducing the extensions
      • JE PayUMoney Plugin Guide
      • JE Job Map Plugin guide
      • JE Paymill plugin guide
      • JE Jobroll Plugin Guide
      • JE Custom Fields Plugin Guide
      • JE Coupon plugin guide
      • JE Stripe Plugin Guide
      • JE Job Alert Plugin Guide
      • JE RSS Importer Plugin Guide
      • JE ET Slider guide
  • DirectoryEngine
    • DE Package content
    • DE Introducing Theme
    • DE Main steps to set up the site
      • DE Import data
      • DE Set up the general information
      • DE Set up Post places form
      • DE Customize the theme
      • DE Menus and widgets
    • DE Complete other settings
      • DE Emails management
      • DE Members and payments management
    • DE Introducing the extensions
  • EstateEngine
    • EE Package content
    • EE Introducing Theme
    • EE Main steps to set up the site
      • EE Import Data
      • EE Set Up Wizard
      • EE Set up general contents
      • EE Set up sidebars and widgets
      • EE Set up the general information
      • EE Setup submitting a property form
      • EE W3 Total Cache
      • EE Customize the theme
    • EE Complete other settings
      • EE Emails management
      • EE Members and payments management
    • EE Introducing the extensions
      • EE MultiRating
  • AE Extensions
    • AE PayUMoney
    • AE Paymill
    • AE SagePay
    • AE Stripe
Powered by GitBook
On this page
  1. JobEngine
  2. JE Introducing the extensions

JE RSS Importer Plugin Guide

PreviousJE Job Alert Plugin GuideNextJE ET Slider guide

Last updated 3 months ago

Downloading and activating JE RSS on your JobEngine

  1. After purchasing JE RSS, download it from your EngineThemes account.

  1. Extract the downloaded file into your wp-content > plugins folder or upload it in Plugins > Upload in back-end.

  2. Activate the plugin in “Plugins” tab in the backend.

Once JE RSS is activated, you can choose to import jobs manually or set a schedule for the system to do the chore for you.

Import jobs from RSS feed manually

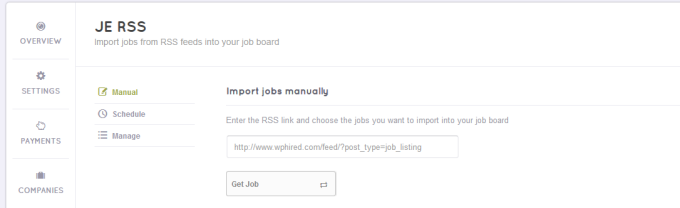
From your Engine Settings menu, select JE RSS then click “Manual.” Enter your rss link and hit “Get Job” to display jobs retrieved from the link.

From the list, select the jobs that you want to import to your site. Choose a category and a job type and assign an employer’s account to act as “author” of your imported jobs. By default, the imported jobs display the current logged in admin account as the author.

Then select how you would want jobseekers to view the job details and submit their applications. Click “Import all selected” jobs to make the jobs active on your site.

Import jobs from RSS feed by Schedule

If you are going to import jobs from rss feeds so frequently, setting a schedule will make the task easier for you. Set your preferences JE RSS will automatically generate new jobs and import them into your JobEngine. How often should the importation occur? Specify the period of days in the “Recurrence” field. If you enter 7, JE RSS will import new jobs one time every 7 days.

To set a schedule:

  1. Click Schedule > Add new

  2. Enter RSS link in the box

  3. Select a category for the jobs

  4. Select a job type

  5. Assign an author from your list of employers. (This is optional. If you leave it blank, the imported jobs will display the current logged in admin account as the author.)

  6. Choose an option for “How to Apply”

  7. Hit “Save Schedule”

You can add as many schedules as you want and edit or delete them anytime. The Schedules’ list will be shown like the image below:

Manage imported jobs

JE RSS also allows a site administrator to manage all imported jobs. Go to JE RSS > Manage to see the complete list of your imported jobs.

With managing your rss-imported jobs, we mean you can decide to keep or delete which jobs. You can remove jobs either manually or by system delete (automatic delete).

To manually delete the jobs, tick the box on the left of each job you wish to remove. Should you want to delete all jobs at once, check the box beside Title. Hit “Delete selected jobs” to complete the action.

To automatically delete jobs, set your preference: Automatically delete imported jobs older than ___ days. Press “Delete Now” if you need to remove those old jobs outright.